


 Extract (6-MSITC) in Healthy Older Adults")
: An In-Depth Exploration into its Thermogenic Role and Social Significance")


FireEye today released Commando VM, a first of its kind Windows-based security distribution for penetration testing and red teaming.
When it comes to the best-operating systems for hackers, Kali Linux is always the first choice for penetration testers and ethical hackers.
However, Kali is a Linux-based distribution, and using Linux without learning some basics is not everyone’s cup of tea as like Windows or macOS operating systems.
Moreover, if you are wondering why there is no popular Windows-based operating system for hackers? First, because Windows is not open-source and second, manually installing penetration testing tools on Windows is pretty problematic for most users.
To help researchers and cyber security enthusiasts, cybersecurity firm FireEye today released virtual machine (VM) based installer for Commando VM –a customized Windows-based distribution that comes pre-installed with useful penetration testing tools, just like Kali Linux.
“Penetration testers commonly use their own variants of Windows machines when assessing Active Directory environments,” FireEye says. “Commando VM was designed specifically to be the go-to platform for performing these internal penetration tests.”
The release 1.0 includes two different VM images, one based upon Windows 7 and another Windows 10.
Both Commando VMs include more than 140 tools, including Nmap, Wireshark, Remote Server Administration Tools, Mimikatz, Burp-Suite, x64db, Metasploit, PowerSploit, Hashcat, and Owasp ZAP, pre-configured for a smooth working environment.
According to one of the authors of Commando VMs, the following are the top three features of the tool that make it more interesting:
- Native Windows protocol support (SMB, PowerShell, RSAT, Sysinternals, etc.)
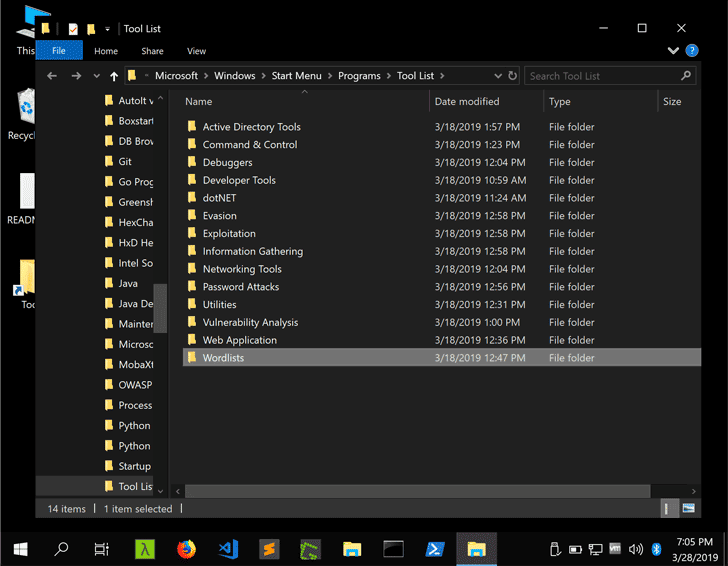
- Organized toolsets (Tools folder on the desktop with Info Gathering, Exploitation, Password Attacks, etc.)
- Windows-based C2 frameworks like Covenant (dotnet) and PoshC2 (PowerShell)
“With such versatility, Commando VM aims to be the de facto Windows machine for every penetration tester and red teamer,” FireEye says.
“The versatile tool sets included in Commando VM provide blue teams with the tools necessary to audit their networks and improve their detection capabilities. With a library of offensive tools, it makes it easy for blue teams to keep up with offensive tooling and attack trends.”
According to FireEye, Commando VM also uses Boxstarter, Chocolatey, and MyGet packages to install all software packages. Running a single command will automatically update all your installed hacking software on Commando VM.
To use this on your Windows computer, you need at least 60 GB of free hard drive space, 2GB of RAM and a virtual machine software, like VMware or Oracle VirtualBox installed on your system.
Installing Commando VM is pretty easy. Just download the Commando VM, decompress it and then execute the PowerShell script available in the package to complete the installation.
The remaining installation process will be done automatically, which may take between 2 to 3 hours to finish depending upon your Internet speed.
“The VM will reboot multiple times due to the numerous software installation requirements,” FireEye says. “Once the installation completes, the PowerShell prompt remains open waiting for you to hit any key before exiting.”
After the completion of the installation process, you’ll be presented with Commando VM, and all you need to do is reboot your machine to ensure the final configuration changes take effect.
In recent years, we have been asked by a number of our readers to list some of the best Windows-based operating systems for penetration testing. Commando VM is the first, and now I believe we will have more to this list really soon.
About Commando VM
Penetration testers commonly use their own variants of Windows machines when assessing Active Directory environments. Commando VM was designed specifically to be the go-to platform for performing these internal penetration tests. The benefits of using a Windows machine include native support for Windows and Active Directory, using your VM as a staging area for C2 frameworks, browsing shares more easily (and interactively), and using tools such as PowerView and BloodHound without having to worry about placing output files on client assets.
Commando VM uses Boxstarter, Chocolatey, and MyGet packages to install all of the software, and delivers many tools and utilities to support penetration testing. This list includes more than 140 tools, including:
- Nmap
- Wireshark
- Covenant
- Python
- Go
- Remote Server Administration Tools
- Sysinternals
- Mimikatz
- Burp-Suite
- x64dbg
- Hashcat
With such versatility, Commando VM aims to be the de facto Windows machine for every penetration tester and red teamer.
For the blue teamers reading this, don’t worry, we’ve got full blue team support as well!
The versatile tool sets included in Commando VM provide blue teams with the tools necessary to audit their networks and improve their detection capabilities. With a library of offensive tools, it makes it easy for blue teams to keep up with offensive tooling and attack trends.

Figure 1: Full blue team support
Installation
Like FLARE VM, we recommend you use Commando VM in a virtual machine. This eases deployment and provides the ability to revert to a clean state prior to each engagement. We assume you have experience setting up and configuring your own virtualized environment. Start by creating a new virtual machine (VM) with these minimum specifications:
- 60 GB of disk space
- 2 GB memory
Next, perform a fresh installation of Windows. Commando VM is designed to be installed on Windows 7 Service Pack 1, or Windows 10, with Windows 10 allowing more features to be installed.
Once the Windows installation has completed, we recommend you install your specific VM guest tools (e.g., VMware Tools) to allow additional features such as copy/paste and screen resizing. From this point, all installation steps should be performed within your VM.
- Make sure Windows is completely updated with the latest patches using the Windows Update utility. Note: you may have to check for updates again after a restart.
- We recommend taking a snapshot of your VM at this point to have a clean instance of Windows before the install.
- Navigate to one of the following URLs and download the compressed Commando VM repository onto your VM:
- Follow these steps to complete the installation of Commando VM:
- Decompress the Commando VM repository to a directory of your choosing.
- Start a new session of PowerShell with elevated privileges. Commando VM attempts to install additional software and modify system settings; therefore, escalated privileges are required for installation.
- Within PowerShell, change directory to the location where you have decompressed the Commando VM repository.
- Change PowerShell’s execution policy to unrestricted by executing the following command and answering “Y” when prompted by PowerShell:
- Set-ExecutionPolicy unrestricted
- Execute the install.ps1 installation script. You will be prompted to enter the current user’s password. Commando VM needs the current user’s password to automatically login after a reboot. Optionally, you can specify the current user’s password by passing the “-password <current_user_password>” at the command line.

Figure 2: Install script running
The rest of the installation process is fully automated. Depending upon your Internet speed the entire installation may take between 2 to 3 hours to finish. The VM will reboot multiple times due to the numerous software installation requirements. Once the installation completes, the PowerShell prompt remains open waiting for you to hit any key before exiting. After completing the installation, you will be presented with the following desktop environment:

Figure 3: Desktop environment after install
At this point it is recommended to reboot the machine to ensure the final configuration changes take effect. After rebooting you will have successfully installed Commando VM! We recommend you power off the VM and then take another snapshot to save a clean VM state to use in future engagements.
Proof of Concept
Commando VM is built with the primary focus of supporting internal engagements. To showcase Commando VMs capabilities, we constructed an example Active Directory deployment. This test environment may be contrived; however, it represents misconfigurations commonly observed by Mandiant’s Red Team in real environments.
We get started with Commando VM by running network scans with Nmap.

Figure 4: Nmap scan using Commando VM
Looking for low hanging fruit, we find a host machine running an interesting web server on TCP port 8080, a port commonly used for administrative purposes. Using Firefox, we can connect to the server via HTTP over TCP port 8080.

Figure 5: Jenkins server running on host
Let’s fire up Burp Suite’s Intruder and try brute-forcing the login. We navigate to our Wordlists directory in the Desktop folder and select an arbitrary password file from within SecLists.

Figure 6: SecLists password file
After configuring Burp’s Intruder and analyzing the responses, we see that the password “admin” grants us access to the Jenkins console. Classic.

Figure 7: Successful brute-force of the Jenkins server
It’s well known that Jenkins servers come installed with a Script Console and run as NT AUTHORITY\SYSTEM on Windows systems by default. We can take advantage of this and gain privileged command execution.

Figure 8: Jenkins Script Console
Now that we have command execution, we have many options for the next step. For now, we will investigate the box and look for sensitive files. Through browsing user directories, we find a password file and a private SSH key.

Figure 9: File containing password
Let’s try and validate these credentials against the Domain Controller using CredNinja.

Figure 10: Valid credentials for a domain user
Excellent, now that we know the credentials are valid, we can run CredNinja again to see what hosts the user might have local administrative permissions on.

Figure 11: Running CredNinja to identify local administrative permissions
It looks like we only have administrative permissions over the previous Jenkins host, 192.168.38.104. Not to worry though, now that we have valid domain credentials, we can begin reconnaissance activities against the domain. By executing runas /netonly /user:windomain.local\niso.sepersky cmd.exe and entering the password, we will have an authenticated command prompt up and running.

Figure 12: cmd.exe running as WINDOMAIN\niso.sepersky
Figure 12 shows that we can successfully list the contents of the SYSVOL file share on the domain controller, confirming our domain access. Now we start up PowerShell and start share hunting with PowerView.

Figure 13: PowerView’s Invoke-ShareFinder output
We are also curious about what groups and permissions are available to the user account compromised. Let’s use the Get-DomainUser module of the post-exploitation framework PowerView to retrieve user details from Active Directory. Note that Commando VM uses the “dev” branch of PowerView by default.

Figure 14: Get-DomainUser win
We also want to check for further access using the SSH key we found earlier. Looking at our port scans we identify one host with TCP port 22 open. Let’s use MobaXterm and see if we can SSH into that server.

Figure 15: SSH with MobaXterm
We access the SSH server and also find an easy path to rooting the server. However, we weren’t able to escalate domain privileges with this access. Let’s get back to share hunting, starting with that hidden Software share we saw earlier. Using File Explorer, it’s easy to browse shares within the domain.

Figure 16: Browsing shares in windomain.local
Using the output from PowerView’s Invoke-ShareFinder command, we begin digging through shares and hunting for sensitive information. After going through many files, we finally find a config.ini file with hardcoded credentials.

Figure 17: Identifying cleartext credentials in configuration file
Using CredNinja, we validate these credentials against the domain controller and discover that we have local administrative privileges!

Figure 18: Validating WINDOMAIN\svcaccount credentials
Let’s check group memberships for this user.

Figure 19: Viewing group membership of WINDOMAIN\svcaccount
Lucky us, we’re a member of the “Domain Admins” group!
Final Thoughts
All of the tools used in the demo are installed on the VM by default, as well as many more. For a complete list of tools, and for the install script, please see the Commando VM Github repo. We are looking forward to addressing user feedback, adding more tools and features, and creating many enhancements. We believe this distribution will become the standard tool for penetration testers and look forward to continued improvement and development of the Windows attack platform.NEXT POST


