


 Extract (6-MSITC) in Healthy Older Adults")
: An In-Depth Exploration into its Thermogenic Role and Social Significance")


To identify the name of OS(Operating System) using Nmap is very easy, but you can also identify the OS name with the help of Ping Command.
For Linux Distributions, we can use Nmap as shown below:
Syntax: nmap -O yeahhub.com
For Windows Distributions, you can use Zenmap which is the graphical version of Nmap.
Now for the same result, you can use Ping command to get the name of OS.
Operating Systems can be detected using Ping Command, Ping is a computer network administration software utility, which used to find the Availability of a host on an Internet Protocol (IP) network.
Ping operates by sending Internet Control Message Protocol (ICMP) Echo Request packets to the target host and waiting for an ICMP Echo Reply.
TTL is simply meant, how long a resolver is supposed to cache the DNS query before the query expires and a new one needs to be done.
These TTL values differ between the Operating system. Here you find TTL value for Range of servers. Reference subinsb.
| Device / OS | Version | Protocol | TTL |
| AIX | TCP | 60 | |
| AIX | UDP | 30 | |
| AIX | 3.2, 4.1 | ICMP | 255 |
| BSDI | BSD/OS 3.1 and 4.0 | ICMP | 255 |
| Compa | Tru64 v5.0 | ICMP | 64 |
| Cisco | ICMP | 254 | |
| DEC Pathworks | V5 | TCP and UDP | 30 |
| Foundry | ICMP | 64 | |
| FreeBSD | 2.1R | TCP and UDP | 64 |
| FreeBSD | 3.4, 4.0 | ICMP | 255 |
| FreeBSD | 5 | ICMP | 64 |
| HP-UX | 9.0x | TCP and UDP | 30 |
| HP-UX | 10.01 | TCP and UDP | 64 |
| HP-UX | 10.2 | ICMP | 255 |
| HP-UX | 11 | ICMP | 255 |
| HP-UX | 11 | TCP | 64 |
| Irix | 5.3 | TCP and UDP | 60 |
| Irix | 6.x | TCP and UDP | 60 |
| Irix | 6.5.3, 6.5.8 | ICMP | 255 |
| juniper | ICMP | 64 | |
| MPE/IX (HP) | ICMP | 200 | |
| Linux | 2.0.x kernel | ICMP | 64 |
| Linux | 2.2.14 kernel | ICMP | 255 |
| Linux | 2.4 kernel | ICMP | 255 |
| Linux | Red Hat 9 | ICMP and TCP | 64 |
| MacOS/MacTCP | 2.0.x | TCP and UDP | 60 |
| MacOS/MacTCP | X (10.5.6) | ICMP/TCP/UDP | 64 |
| NetBSD | ICMP | 255 | |
| Netgear FVG318 | ICMP and UDP | 64 | |
| OpenBSD | 2.6 & 2.7 | ICMP | 255 |
| OpenVMS | 07.01.2002 | ICMP | 255 |
| OS/2 | TCP/IP 3.0 | 64 | |
| OSF/1 | V3.2A | TCP | 60 |
| OSF/1 | V3.2A | UDP | 30 |
| Solaris | 2.5.1, 2.6, 2.7, 2.8 | ICMP | 255 |
| Solaris | 2.8 | TCP | 64 |
| Stratus | TCP_OS | ICMP | 255 |
| Stratus | TCP_OS (14.2-) | TCP and UDP | 30 |
| Stratus | TCP_OS (14.3+) | TCP and UDP | 64 |
| Stratus | STCP | ICMP/TCP/UDP | 60 |
| SunOS | 4.1.3/4.1.4 | TCP and UDP | 60 |
| SunOS | 5.7 | ICMP and TCP | 255 |
| Ultrix | V4.1/V4.2A | TCP | 60 |
| Ultrix | V4.1/V4.2A | UDP | 30 |
| Ultrix | V4.2 – 4.5 | ICMP | 255 |
| VMS/Multinet | TCP and UDP | 64 | |
| VMS/TCPware | TCP | 60 | |
| VMS/TCPware | UDP | 64 | |
| VMS/Wollongong | 1.1.1.1 | TCP | 128 |
| VMS/Wollongong | 1.1.1.1 | UDP | 30 |
| VMS/UCX | TCP and UDP | 128 | |
| Windows | for Workgroups | TCP and UDP | 32 |
| Windows | 95 | TCP and UDP | 32 |
| Windows | 98 | ICMP | 32 |
| Windows | 98, 98 SE | ICMP | 128 |
| Windows | 98 | TCP | 128 |
| Windows | NT 3.51 | TCP and UDP | 32 |
| Windows | NT 4.0 | TCP and UDP | 128 |
| Windows | NT 4.0 SP5- | 32 | |
| Windows | NT 4.0 SP6+ | 128 | |
| Windows | NT 4 WRKS SP 3, SP 6a | ICMP | 128 |
| Windows | NT 4 Server SP4 | ICMP | 128 |
| Windows | ME | ICMP | 128 |
| Windows | 2000 pro | ICMP/TCP/UDP | 128 |
| Windows | 2000 family | ICMP | 128 |
| Windows | Server 2003 | 128 | |
| Windows | XP | ICMP/TCP/UDP | 128 |
| Windows | Vista | ICMP/TCP/UDP | 128 |
| Windows | 7 | ICMP/TCP/UDP | 128 |
| Windows | Server 2008 | ICMP/TCP/UDP | 128 |
| Windows | 10 | ICMP/TCP/UDP | 128 |
Operating Systems can be detected using Ping Command
Usage of Ping:
Ping operates by sending ICMP (Internet Control Message Protocol) Echo Requests packets to the host and waiting for an ICMP Echo Reply.
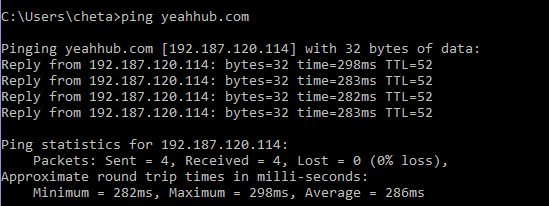
Syntax: ping yeahhub.com
Now as you can see, it shows some TTL value which is currently 52, TTL(Time To Live) means how long a resolver is supposed to cache the DNS query before it expires and a new one needs to be done.
We should run the traceroute command first to determine the hops between the Target and the destination.
Here is the complete chart where you can see all TTL values of all servers.
For Unix/Linux — TTL Value = 64
For Windows — TTL Value = 128
For Solaris/AIX — TTL Value = 254
Now to find the OS you need to calculate two things, one is PING TTL value and second is tracert hops.
For Tracert, you can use this below syntax:
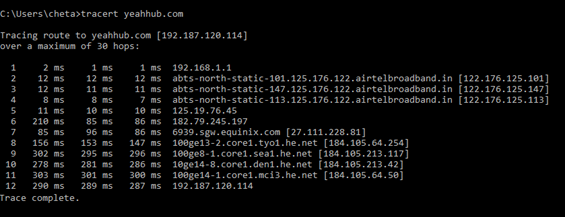
tracert yeahhub.com
Tracert basically determine the hops between the Target and the destination.
So as you can see, the total No. of Hops are 12 and our TTL value is 52, by making the sum of TTL value + number of hops results 52+12 = 64, which means the server is a LINUX Machine.
*-*-*-*-*-
Powershell to detect Operating System :
Power-shell have its function & cmdlets that can work as same as ping to get TTL value , so because I wanted to automate the whole Operating system detection process using TTL in single power-shell module as ping.
In coding part I wrote a power-shell module with PsPing function for Os in which I implemented test-connection cmdlet of powershell.
| #TTlOs.psm1 | |
| #< | |
| # Ping scanner with os detection according with ttl value. | |
| # Test-connection is a type of function in powershell uses as a ping command. | |
| #> | |
| # | |
| function PsPing | |
| { | |
| param($ip) | |
| Process | |
| { | |
| $os = (Test-Connection -Count 1 $ip).ResponseTimeToLive | |
| if ($os -lt 65 ) | |
| { | |
| write-host -f yellow “Target is running on Linux Machine according to TTL value ${os}” | |
| } | |
| elseif($os -gt 64 -and $os -lt 129) | |
| { | |
| write-host -f green “Target is running on Window Based Machine according to TTL value ${os}” | |
| } | |
| else | |
| { | |
| Write-host -f blue “Target running on cisco.” | |
| } | |
| } | |
| } |
view rawTTLOs.psm1 hosted with ❤ by GitHub
To run above module / script I opened up my power-shell terminal:
1. import-module -name 'path of file/name'
2. get-command -module TTLOs.psm1
3. PsPing google.com
Execution:
exploit > import-module -name TTlOs.psm1
exploit > wc F:\coding_part\powershell_scripting\scripts\TTlOs.psm1
 52 130 803 F:\coding_part\powershell_scripting\scripts\TTlOs.psm1
exploit > PsPing google.com
Target is running on Linux Machine according to TTL value 53
*-*-*-*-*-
What is Ping & how it works
PING stands for Packet InterNet Groper. A utility or program to determine whether a specific IP address or host / server is accessible from your network or not.
The ping utility is commonly used to check for network errors & to diagnosis that problem. It’s working mechanism is simple but life saving.
It works by sending a packet to the specified IP address / host / server address and waiting for a reply from that host and measured the delay of that response. This is also known as latency.
So, you can know whether a host is reachable from your network and how fast you get a response from that host after you’ve sent out a PING request. A fast ping or low latency means a more responsive connection, especially in applications where time is everything (like online web games).
Normally, ping is measured in milliseconds (ms). higher latency means you have some problem with your network for sure. Though this latency varies a lot depending or routing and Geo location.
If you are in USA and you are pinging a host of USA then the delay will be lower. But if you are in USA and you are pining a host of Bangladesh then definitely your latency will be higher due to Geo location and number of HOPs for that routing.
PING is the primary troubleshoot technique for any connections. It will reply or echo for a response. Ping send a message to a server / host that contains the message “PING” and receive a copy of the message back from that host / server.
Ping calculate the “Round Trip Time” (or RTT) that it takes a packet to reach a particular server / host.
Every modern operating system has this ping tool pre installed. So, you can find this utility program on every OS just from the terminal ( If you are running like UNIX / Linux operating System ) or from the ( Command prompt / MS DOS Prompt ) if you are running a MS Windows operating system.
Note: Some host or server may block or not allow any ping or ICMP request for security.
Here, I will show you ping examples by using an Ubuntu 14.04.3 LTS Linux OS. You can use whatever Linux distribution you have.
Getting ping version
To know the version, open a terminal and issue the below command.
sudo ping -V

It will give you the currently installed ping versions to you.
Ping Execution
There are few differences while you are performing a ping test or pining from a MS Windows based OS and UNIX / Linux like OS.
Simple ping command takes only one parameter and the parameter is the host name or the host IP address that you want to ping. A simple ping example is just like below. Open a terminal and type the following
ping unixmen.com
Here unixmen.com is the host name or a host.
With the above command you will see something like this
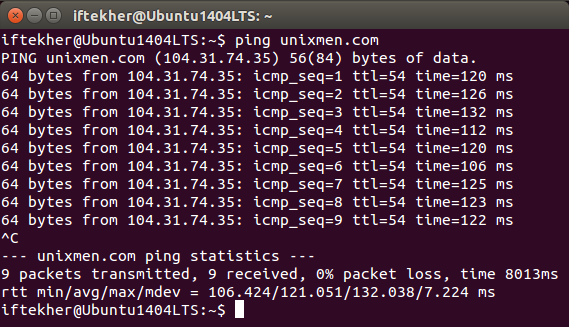
You need to stop the ping command by pressing CTRL+C. Else it will ping for infinite time until you stopped it. After every ping commands, it will display a summery report with these following.
Min: Minimum time that takes to get a respond from the host that has been pinged from your end.
Avg: Average time that takes to get a respond from the host that has been pinged from your end.
Max: Maximum time that takes to get a respond from the host that has been pinged from your end.
Also you will see TTL which stands for Time To Live. Ping use a numerical TTL value to attempt to reach a given host computer via the route path. This is also known as hop limit. TTL limits the time of data over a network for different purposes such as DNS records, HTTP, ICMP etc.
Ping from local / private network
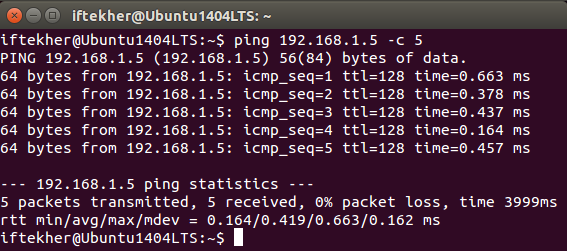
To ping a host of your local / private network , you need to type the IP address of that host
ping 192.168.1.5 -c 5
Here, 192.168.1.5 is the host that I want to ping from my local network. This is a host of my local network. I hope that you know all the blocks of private network and those hosts as well.
You will see something like this.
Ping count / numbers
Normally, when you run a simple ping command without passing any additional parameters, it will ping that host for infinite time while you are using any Linux OS.
So say, I want ping a host for 10 times, so I will type the following on my terminal.
ping -c 10 unixmen.com
You will see something like below image.
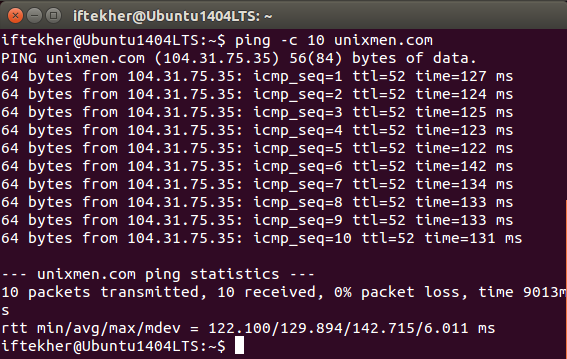
Here you can see that it ping 10 times and then it displays the ping summary report to you.
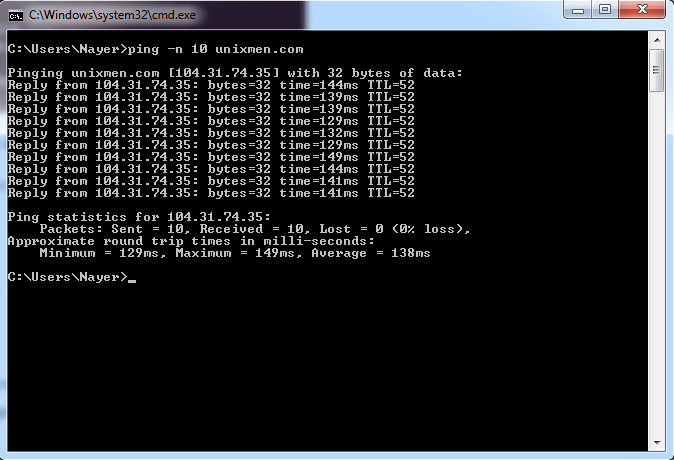
If you are running from a MS Windows OS, type this on the command prompt
ping -n 10 unixmen.com
Different packet size
By default, it sends 64 bytes of a ping request to a host if you are using any Linux OS and it will send 32 bytes if you used any MS Windows OS. If you want to change it and want to send heavy packet then do the following
ping -s 100 -c 6 unixmen.com
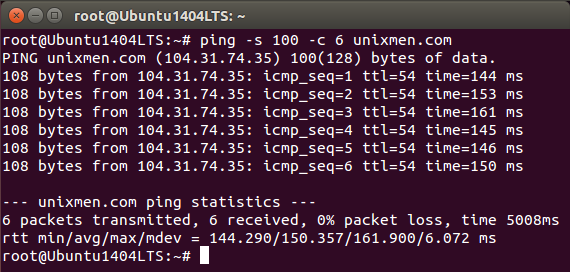
Here, you can see that It is not sending 64 bytes. It is sending 108 bytes.
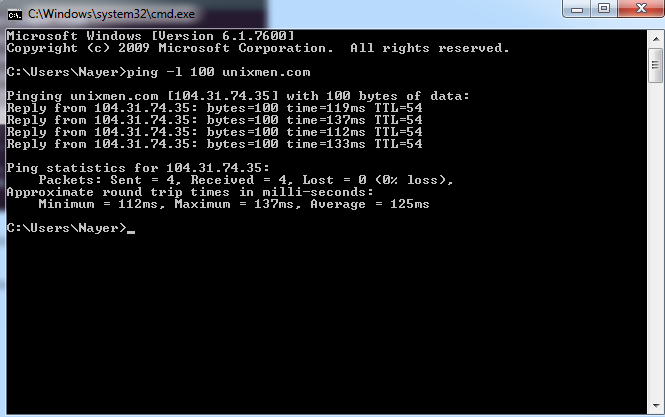
or
From MS Windows OS , type the following
ping -l 100 unixmen.com
Increase or decrease the time interval
By default ping waits for 1 second before sending the next packet towards the destination host. You can increase or decrease this using option -i if you wish according to meet your requirements.
Let’s Increase ping time interval by 3 seconds so that it send ping request after each 3 seconds
ping -i 3 unixmen.com
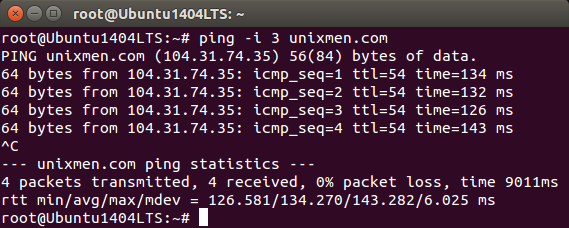
It will send a ping request with a 3 seconds interval time.
If you want to decrease ping time interval, issue the below command
sudo ping -i 0.2 unixmen.com
Flood with ping
This is used to send packets soonest. This is used to test network performance. To do so, issue the below command in the terminal.
sudo ping -f unixmen.com
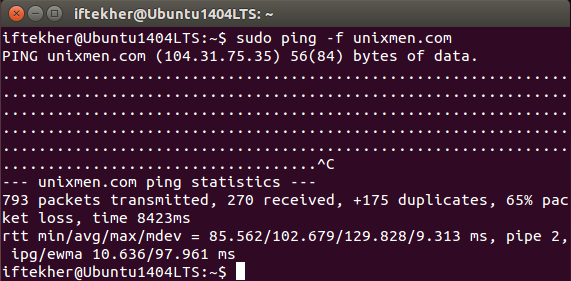
Press CTRL+C to stop this. You will see something like this and it may differ one host to another and how good your internet connection is.
Ping with summary statistics
If you want to see the ping summary statistics report only then use the following method. Use option -q to view only the ping statistics summary.
ping -c 5 -q unixmen.com
You will see something like this just below image.
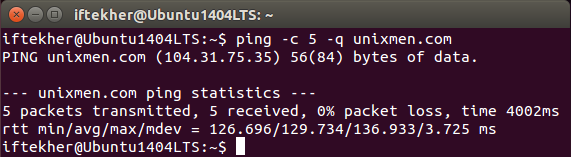
Here, you can see that it is not echoing or replying the acknowledgment from the host. It’s just showing the report.
Ping timeout
If you pass the parameter -w with your ping command then it will specifies the deadline to terminate the ping output. This specifies the total number of seconds the ping command should send packets to that remote host.
ping -w 6 unixmen.com
So, the above command will ping the host for 6 seconds and then it will be terminated automatically and will display the result.
Ping output explanation
While pining a host you will find different output from the ping results.
Destination Host Unreachable
If the message is simply “Destination Host Unreachable,” then possible best reason is there is no route from the local host system and between the packets that has been sent to the destination desired destination host or a remote router reports that it has no route to the destination host.
Request timed out
If you see Request timed out it means or indicates that no Echo Reply messages were received within the default time of 1 second or the time that you set while you are pining that host. This can be due to many different causes; the most common include network congestion, failure of the ARP request, packet filtering / firewall, routing error, cable fault or switch / router port problem etc etc.
Unknown host / Ping Request Could Not Find Host
ping unixmens.com
May be you misspelled the host name or the host does not exits at all in the real internet cloud. Note that, I intentionally misspelled the host name while I ping.
For every ping results you must have 0% packet loss with a good latency or lower response time. Depending of which transmission medium ( UTP, Fiber Optics Cable, Wi-Fi ) you are using your latency will differ.
*-*-*-*-*-
The 10 Best Ping Sweep Tools And Software
The time has come to reveal what our 10 best ping sweep tools are. Our list contains a mix of tools for Windows and other platforms. We also made sure to include both command-line and graphical user interface utilities. Some of the tools on our list will do much more than Ping sweeps while some won’t.
1. SolarWinds Ping Sweep
First on our list is an excellent tool from SolarWinds which makes some of the best network administration software. The company is also known for its free tools.
This tool is part of the SolarWinds Engineer toolset, a bundle of more than 60 useful, Windows-based network management utilities, including Ping Sweep.
Using this tool couldn’t be easier. It has a GUI where you simply need to enter the IP address range you want to scan. The range can be as big as you need it to be. You can even scan a discontinuous list of IP addresses from a text file. For instance, you could extract a list of assigned IP addresses from your DHCP server and scan it to which ones are actually used.

No matter how you specify the addresses to scan, the tool will ping them all and list those that responded. The results can be exported to several file types such as CSV, XML, or even a web page. This lets you analyze the results using any tool you prefer. The results, of course, don’t just include the IP addresses of the responding hosts. It also shows you their response time and it does a reverse DNS lookup to find their hostnames.
Pricing for the SolarWinds Engineer Toolset–including Ping Sweep–starts at $1 495. This is a per named user price and you’ll need one license for each named user. It might seem a bit expensive but all the other included tools make this well worth the investment.
2. Nmap/Zenmap
Nmap is almost as old as Ping. This tool has been around for ages and it’s commonly used for mapping network–hence the name–and accomplish several other tasks. For instance, Nmap can be used to scan a range of IP addresses for open IP ports. This is a command-line utility but, for those who prefer graphical user interfaces, its developers have published Zenmap, a GUI front-end to this powerful software. Both packages can be installed on Windows, Linux, Unix and OS X.

Using Zenmap, all the detailed search parameters can be saved in a profile that you can recall at will. The tool comes with several built-in profiles that you can use as a starting point and modify to suit your exact needs. The profile also controls how the results of the scan are displayed. The interface’s first tab shows the raw output from the underlying nmap command while other tabs show an easier to understand interpretation of the raw data.
3. Fping
Fping was created some 10 years after Ping as an improvement over the popular network troubleshooting tool, Although it is a similar tool, it is quite different. Like Ping, Fping uses ICMP echo requests to determine if the target hosts are responding but the similarity ends there.
Contrary to Ping which only accepts a single IP address as a parameter, Fping can be called with many target IP addresses. There are several different ways that these targets can be specified. It could be a space-delimited list of IP addresses. It could also be the name of a text file containing a list of addresses.
An IP address range can also be specified or a subnet can be entered in CIDR notation such as 192.168.0.0/24.
To improve performance, Fping does not wait for a response before sending the next echo request, thereby not losing time waiting for unresponsive IP addresses. Fping also has a ton of command-line options that you can use. You can also pipe its output to another command to further process the results. Overall, this is an excellent tool, especially for scripting on Linux computers.
4. Network Pinger
Network Pinger is a freeware tool for Windows. Its interface is amongst the most intuitive you can find. But more important than its user interface is the tool’s performance. This tool was optimized for the best possible performance. It can, for instance, send 1000 ping in just 35 ms. Network Pinger has several tools built right into it. Here’s a quick overview of some of them. There’s automated mass pings, traceroutes, port scanning, WMI, DNS and Whois queries, an IP calculator and converter, and many more.

Network Pinger makes excellent use of its graphical user interface and offers several visual features. It will, for example, built live charts as it performs a ping sweep displaying a visual rendition of the important statistics such as a pie chart depicting the responding vs non-responding hosts or a graph if average response times.
5. Hping
Hping is another command-line tool inspired by Ping. It’s available on most Unix-like operating systems as well as OS X and Windows. The tool is no longer actively developed but it is still in widespread use. Although it closely resembles Ping, it is quite different. For instance, Hping won’t only send ICMP echo requests. It can also send TCP, UDP or RAW-IP packets. It’s also got a traceroute mode and has the ability to send files over a covered channel.
Hping can be used as a simple Ping sweep tool but it can do much more than that. For instance, the tool has some advanced ports scanning features. It can be used for network testing thanks to its use of multiple protocols. Hping also has some advanced traceroute capabilities using any of the available protocols.
This can be useful as some devices treat ICMP traffic differently from other traffic. By mimicking other protocols, this tool can give you a better evaluation of your network’s true, real-life performance.
6. Angry IP Scanner
Angry IP scanner. is a deceptively simple tool and it is one of the fastest due to its extensive use of multithreading. This is a multiplatform tool that will run on Windows, OS X, or Linux. One small drawback: the tool is written in Java so you’ll need the Java runtime module to use it. The Angry IP Scanner will not only ping IP addresses, it can also do a port scan on discovered hosts.
It will also resolve hostnames and resolve MAC addresses to vendor names. Furthermore, the tool will provide NetBIOS information about the hosts.

The Angry IP scanner can scan complete networks and subnets but also an IP addresses range or a list of IP addresses in a text file. Another nice feature is that although this is a GUI-based tool, there’s also a command-line version that you can use if you want to include the tool’s functionality in your scripts. As for the results, they are displayed on screen in a table form but can also be easily exported to several file formats such as CSV or XML.
7. Advanced IP Scanner
Advanced IP Scanner is another excellent Ping sweep tool with an interesting twist. This tool, which runs on Windows is totally geared towards that operating system and several of its advanced functions are Windows-related. Its publisher claims this free software is used by over 30 million users worldwide. This is a portable tool that requires no installation

Functionality-wise, the tool takes an IP address range as input. Alternatively, you can also supply a text file with a list of IP addresses. And when the results come in, they’re impressive. Not only do you get the list of IP addresses that responded but you also get the corresponding hostname, MAC address and network interface vendor. But there’s more.
For each Windows host, you have a list of its network shares. And it’s a live list. You can click any share to open it on your computer–provided, of course, that you have the proper access rights.
You can also start a remote control session with any discovered Windows host using either RDP or Radmin or remotely turn a computer off.
8. NetScan Tools Basic Edition
There are two different versions of NetScan Tools, a paid one called NetScan Tools Pro Edition and a free, ad-supported one called NetScan Tools Basic Edition with a reduced feature set. Both are tool sets which include multiple utilities and both include a Ping sweep tool called Ping Scan. Let’s have a look at the Basic edition.

NetScan Tools’ Pinc Scan takes an IP address range as input, like most other Ping sweep tools. This is a simple tool that will return a list of all the scanned IP addresses with their hostname (when resolvable), average response time and a status in text form. Other useful tools in NetScan Tools Basic edition include DNS tools, Ping, Graphical Ping, Traceroute, and Whois.
9. Pinkie
Pinkie is another pretty useful toolset which includes several utilities beyond a simple Ping sweep function. Doing a Ping sweep is as simple as specifying a starting IP address and subnet mask and host count. The tool will then ping every successive IP address starting at the specified address until it reaches the host count or the subnet limit.
As an option, you can choose to only include live hosts in its results. And if you do, the pinged host count will only include those that respond.

Results are displayed in a table with IP address, hostname if resolvable and response time which is the Ping average round-trip delay. There is no save or export function for the result but they can be copied to the clipboard and pasted in another application such as a text editor or a spreadsheet.
Other tools bundled in the Pinkie toolset include a standard Ping, a traceroute, a port scanner, a subnet calculator, and even a TFTP server.
10. MiTeC Network Scanner
The MiTeC Network Scanner is another multi-use tool. At its core is a very powerful Ping sweep function that can find any responding host in the specified IP address range. The software will list each found device’s MAC address, hostname, and response time. But it can do much more than just Ping them.
It will, for instance, list interfaces of SNMP-enabled devices. It will also identify Windows computers and let you see their shares, remotely shut them down, perform remote execution, and more.

The sweep’s results show up as a table on the tool’s dashboard that can be exported to a CSV file to be used with another tool. This tool can run on most modern versions of Windows–either workstation or server–since Windows 7. As for the tool’s other advanced features, you’ll find a Whois function and a DNS resolution function, among others.


